Before deciding on which marine organism to use as the base prototype, I believe I need to first understand the characteristics of the Coral Sea. After researching relevant materials, I have learned that the Coral Sea is a colorful kingdom of corals, tropical fish and large marine creatures: vibrant corals form habitats, clownfish, butterflyfish and parrotfish adorn the coral reefs, while whale sharks, sea turtles and orcas swim among them, constituting one of the richest marine ecosystems on Earth.
While researching the general marine life in the Coral Sea, I became particularly interested in seahorses. Therefore, I have decided to base my series of creations on seahorses and incorporate new design elements.
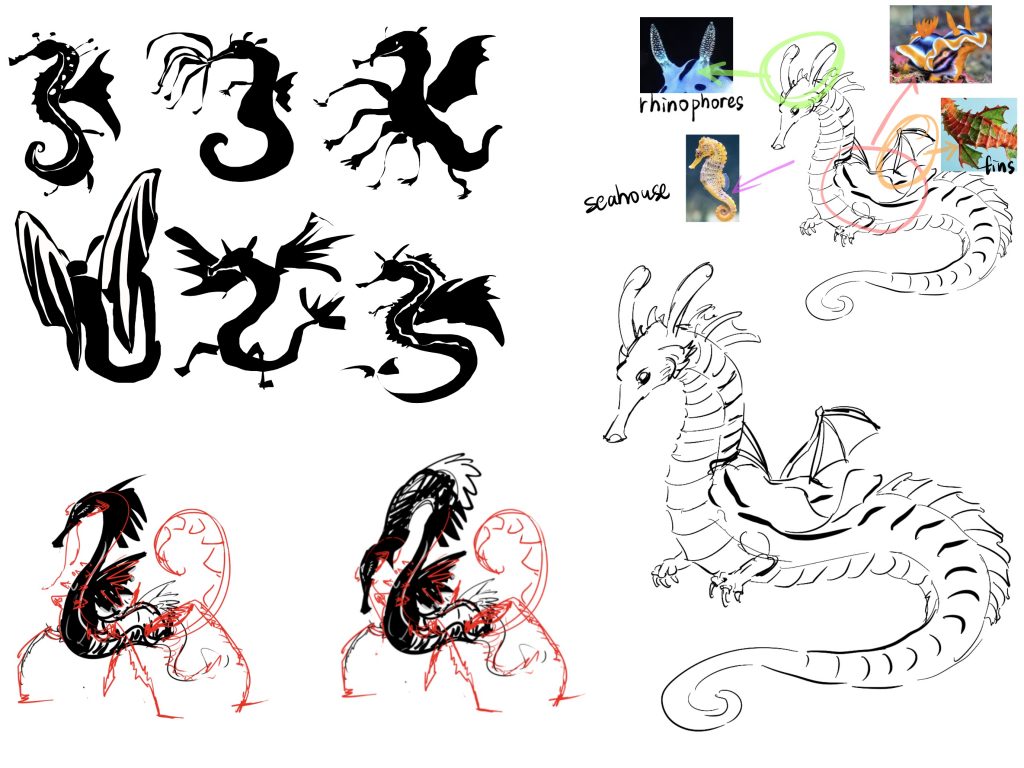
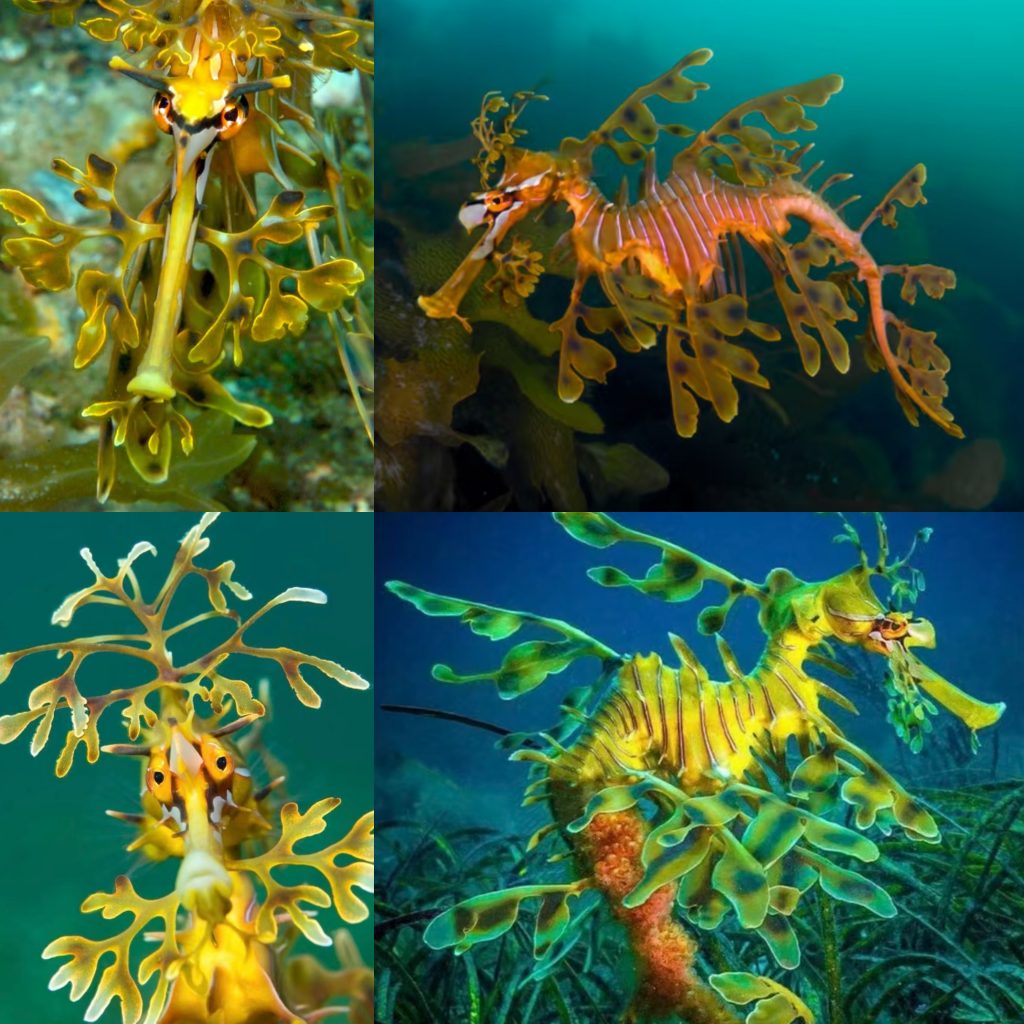
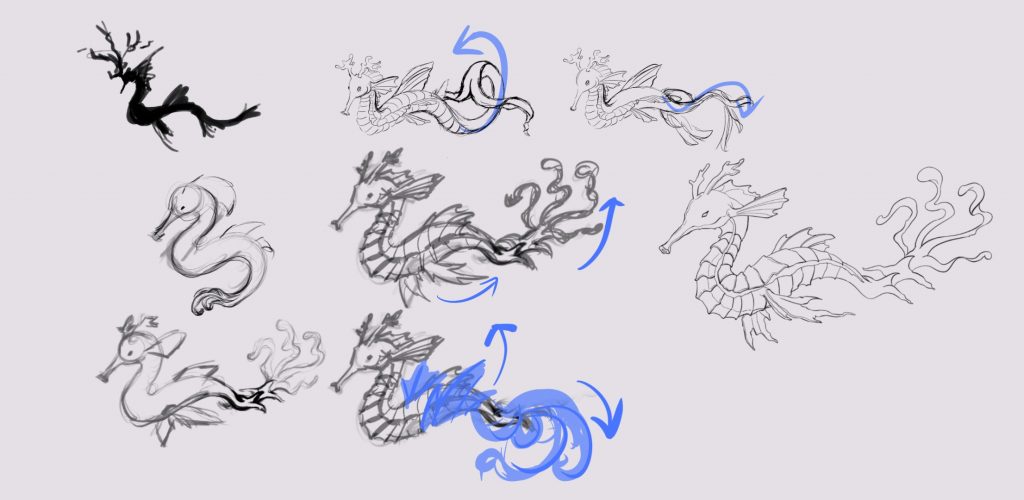
I was also deeply interested in creatures such as leafy seadragons. As close relatives of seahorses, they do not naturally live in the Coral Sea. However, their unique appearance has sparked abundant creative inspiration for me. Their bodies are covered with translucent leaf‑like skin appendages resembling seaweed, which are their most distinctive feature, and the horn‑like protrusions on their heads look like twigs. Since the creature I am designing is supposed to inhabit the Coral Sea, I added two coral‑shaped tentacles to the head of my seahorse‑based creature in my sketches.
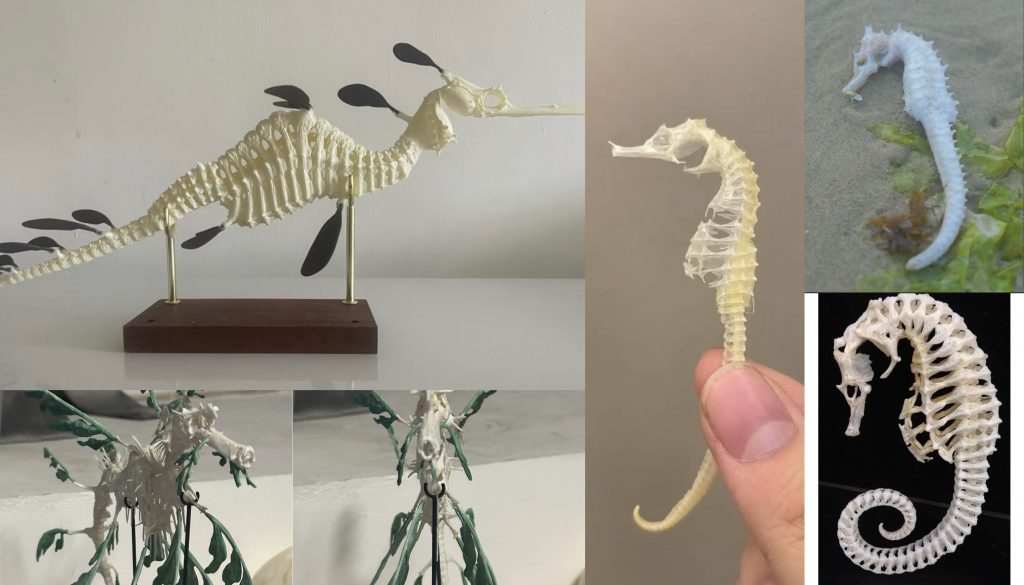
Initially, my idea was to combine seahorses with nudibranchs. I planned to model the appendages on the seahorse’s head after the rhinophores of nudibranchs, to add a unique, whimsical touch to the design. However, as I refined the concept to better fit the ecological characteristics of the Coral Sea, I adjusted this element: I redesigned the head appendages into coral-shaped tentacles instead. Given that the Coral Sea is home to an abundance of corals, this modification allows my seahorse-inspired creature to blend into the reef environment more naturally, providing it with effective camouflage in its habitat.
Overall Design Concept
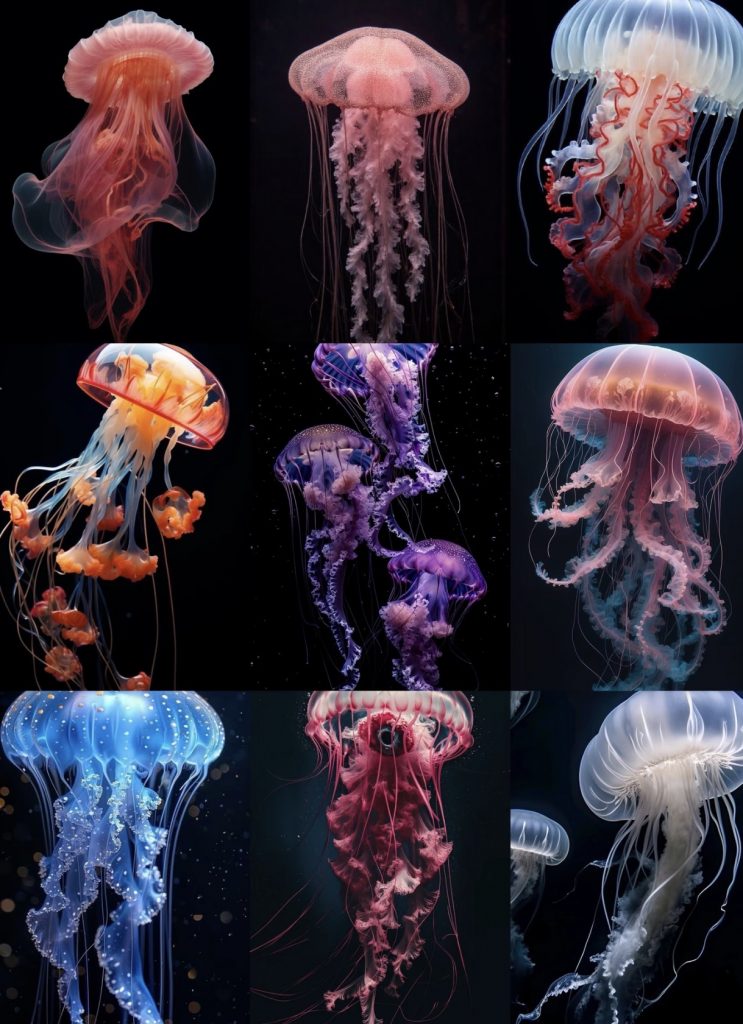
I designed this fantasy creature that inhabits the Coral Sea, mainly based on real‑world seahorses and leafy seadragons. While retaining realistic biological logic, I integrated dreamy jellyfish‑inspired elements and functional structures suitable for movement in the Coral Sea, refining its final form step by step.
First, the segmented hard shell covering its body is inspired by the bony plates of real seahorses. Real seahorses have segmented bone plates that protect their bodies and support their slender torsos. I kept this segmented structure in my design. On one hand, it follows the original features of seahorses, making the design grounded and natural. On the other hand, the segmented hard shell supports its long and soft body to prevent it from looking limp. I softened the sharp edges of the hard shell into wavy folds, and used translucent pink‑and‑white gradient colours to weaken the aggressive look of armour. This matches the overall gentle and ethereal style, and forms unique textures suitable for creatures living in the Coral Sea.
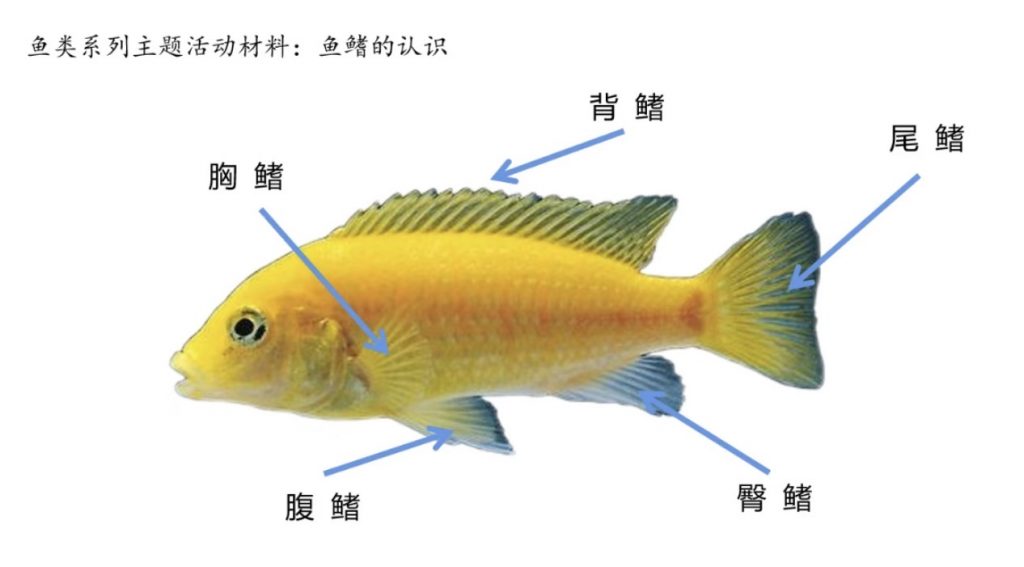
Next is the design and integration of the two pectoral fins. When I only finished the torso and jellyfish‑style tail at first, I found the creature lacked functional structures for underwater movement, resulting in stiff swimming poses. Referring to the pectoral fins of seahorses and ordinary fish, I added a pair of thin fins on the front side of its torso, below the head. This position perfectly fits the body structure of seahorses. Located near the front centre of gravity, the fins balance the body, assist steering and adjust swimming directions to adapt to the complex water currents of the Coral Sea. I made the fins thin, translucent and soft‑edged, consistent with the soft folds of the torso and flowing jellyfish tail. They blend naturally with the seahorse‑like body, satisfying functional swimming needs in the Coral Sea while enhancing its light and dreamy motion.
Finally, the jellyfish‑inspired tail. After finalising the body and fins, a regular fish tail or leafy seadragon‑style tail would look bulky and rigid, clashing with the bright and lively vibe of the Coral Sea I wanted to create. I thought of jellyfish commonly found in the Coral Sea — soft‑bodied, flowing and translucent, swaying gently with ocean currents. Therefore, I combined the flowing, frilly structure of jellyfish with the seahorse’s tail to replace a normal fish tail. The tail is no longer just a propeller for movement. It sways and unfolds with water flow while swimming, cooperating with the two side fins: the fins control balance and direction, and the jellyfish tail provides soft propulsion. This lets the creature swim elegantly and lightly, shaping it as a quiet, gentle and dreamy spirit of the Coral Sea.
Overall, this design takes seahorses as the base, uses segmented hard shells for support and texture, adds functional pectoral fins for movement in the Coral Sea, and adopts a jellyfish tail for flowing motion. It perfectly combines biological functionality, real‑world prototypes and fantasy aesthetics.
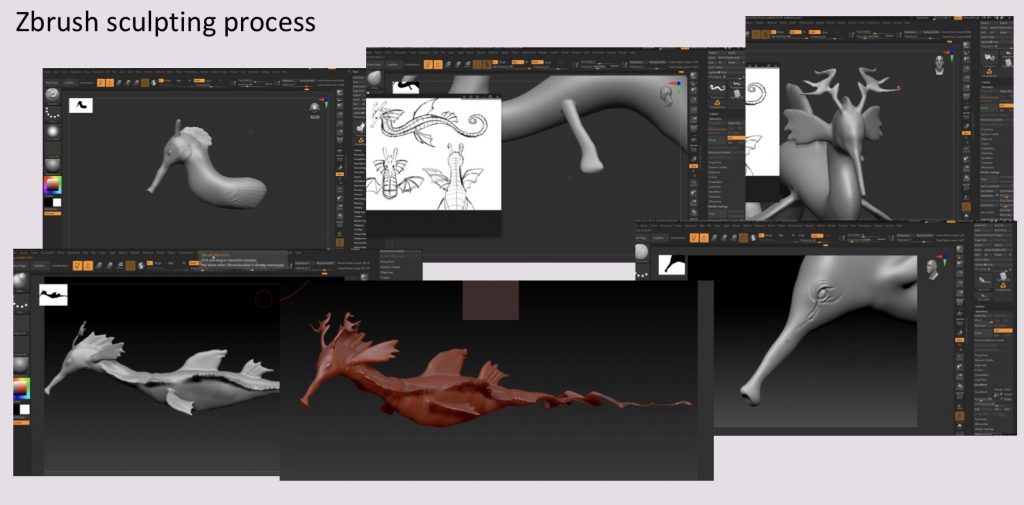
Step‑by‑Step ZBrush Sculpting of the Seahorse Creature
- Blocking out the main shape
I started with a Cylinder3D from the Tool palette. Using the Move brush, I pulled the cylinder into the basic seahorse silhouette: a curved head, a bent neck, a slightly swollen belly, and a tail curled inward. I kept DynaMesh active (resolution around 128) to maintain even topology while freely shaping the volume. - Refining the head and snout
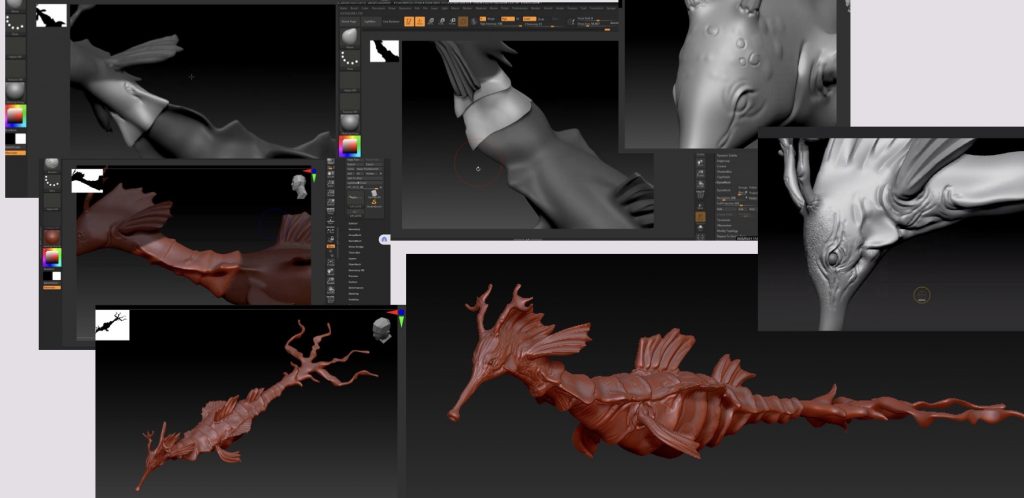
With the ClayBuildup brush I added mass to the head area. Then I used Move to stretch the snout forward and tilt it slightly downward – a typical seahorse trait. For the coronet (the horn‑like crown on the head), I used the SnakeHook brush to pull out three to four branched prongs from the back of the head. The DamStandard brush helped carve horizontal ridges along each prong to make them look bony. - Eyes and bony rings
I dug shallow eye sockets with ClayBuildup in subtractive mode (Alt key) and later placed small spheres as eyeballs. The most characteristic feature of a seahorse is the segmented bony rings along the body. I switched to the Standard brush with ZSub on and carved transverse grooves from the back of the neck down to the tail base. In total I created about 12–14 distinct rings. To make the edges crisp, I used TrimDynamic to flatten the planes between rings, then Pinch to sharpen the ridges. - Fins
The dorsal fin was built on the back, starting behind the coronet and extending to the mid‑body. I extruded thin fin flaps with SnakeHook, then used DamStandard to draw individual fin rays. Each ray was pinched with the Pinch brush. The pectoral fins (behind the eyes) were shaped as small leaf‑like fans with the Move brush, then polished thin with Polish. - Surface details and texture
First I applied a fine grain using the Surface panel’s NoiseMaker (low intensity, small scale). Then I added hand‑made details:
· With DragRect and Alpha 58 (dot pattern), I placed small tubercles near the joints of the bony rings.
· The Slash2 brush added random scratches and wrinkles across the skin.
· Around the coronet, eye sockets and the tip of the tail I used the MalletFast brush to build a rough, bone‑like texture.
Finally, I used Pinch to sharpen all ridge lines and fin edges, and Polish to smooth the larger belly areas – creating a contrast between soft and hard surfaces. - Polypaint (optional preview)
I turned on Polypaint and brushed a light gold colour on the high points, with coral red and dark purple around the snout and joints. The back was darkened with a deep brown, while the front received a warm ochre to enhance the 3D volume. - Final mesh preparation
The final sculpt reached about 5 million polygons. Before exporting, I ran ZRemesher to reduce the polycount while keeping the ring and fin silhouettes, then used Project All to transfer the high‑res details back onto the low‑poly mesh – ready for further texturing or rendering.
After the high‑poly is finished, duplicate the model and reduce the polygon count to about fifty to eighty thousand with ZRemesher to create the low‑poly. Keep Groups and Smooth Groups enabled for clean topology. Then project the high‑poly details onto the low‑poly using Project All, repeating two or three times until all details are transferred. Next, unwrap UVs: use AUV Tiles in the UV Map panel for automatic unwrapping, then check for stretching with UV Checker. If needed, manually mark seams with ZModeler and click Unwrap. Export the low‑poly with UVs as FBX or OBJ.
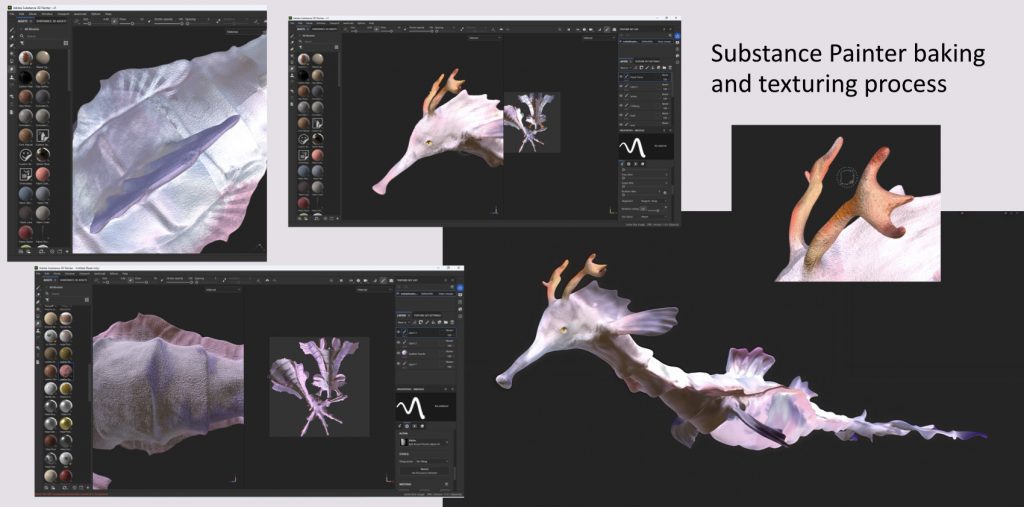
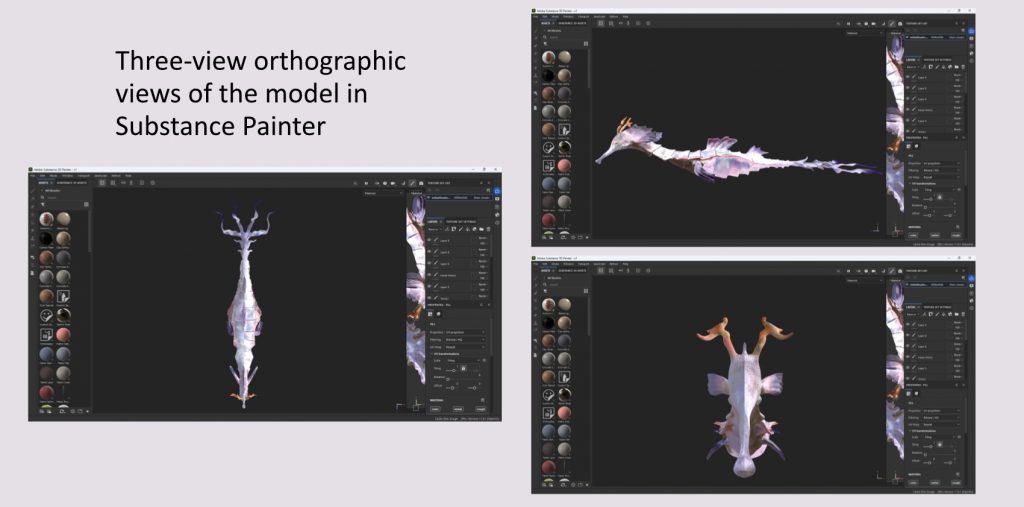
Move to Substance Painter. Create a new project, import the low‑poly, and set the resolution to 4096. First bake the mesh maps: open TextureSet Settings, click Bake Mesh Maps, load the high‑poly mesh, and bake Normal, AO, Curvature, Position, Thickness maps. Verify the normal map orientation. Then create materials: add fill layers and adjust Base Color (gold, coral red, dark purple), Metallic (0.2–0.4 for bony rings, 0 for skin), and Roughness (low for the smooth belly, high for rings and fin bases). Use a black mask with a white brush to paint different regions. Add procedural noise and generators for realism. Finally export textures using a template suitable for Maya Arnold, exporting BaseColor, Metallic, Roughness, Normal, AO, and other maps.
Import the model and textures into Maya. Import the FBX, then create an aiStandardSurface material. Connect the textures: BaseColor to Color, Metallic to Metalness, Roughness to Roughness, Normal to Normal Camera, and multiply AO with Color using a Multiply node. Assign the material to the model and preview with Arnold.
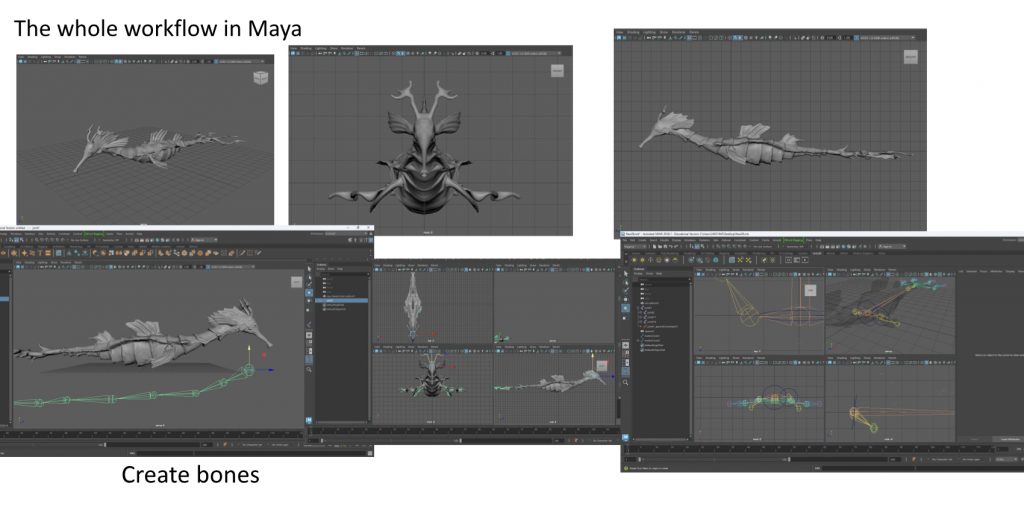
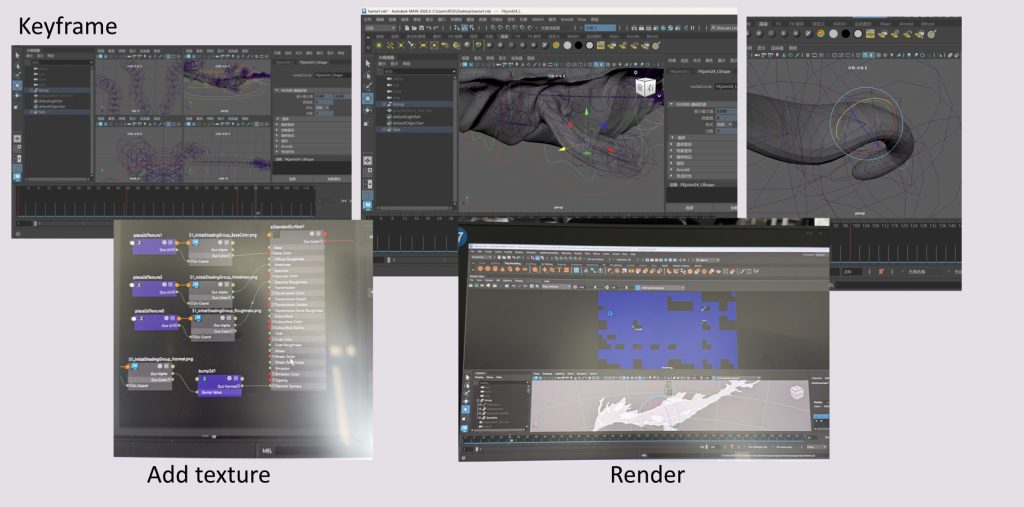
Now rig the model and create animation in Maya. Use the Joint Tool to build a joint chain starting from the tail tip, then along each bony ring centre up to the belly, neck, head, and snout tip. The number of joints should roughly match the number of body rings. Create an IK Spline Handle for the tail and neck, using a NURBS curve to control bending. Use FK or simple rotation controllers for the head and snout. For skin binding, select the model then the root joint and perform a Smooth Bind with Closest Distance or Geodesic Voxel method. Paint skin weights with the Paint Skin Weights Tool: each joint should primarily control its corresponding bony ring area, and fins should be weighted to adjacent chest or back joints. Create NURBS circles as controllers and constrain them to joints or IK handles using Parent Constraint or Point+Orient Constraint. Organise controllers in a separate layer and lock the original skeleton layer. Finally, set the timeline to 24 fps, keyframe controller translations and rotations to create swimming, turning, and tail curling motions. Tail wave can be achieved by animating the curve of the IK Spline.
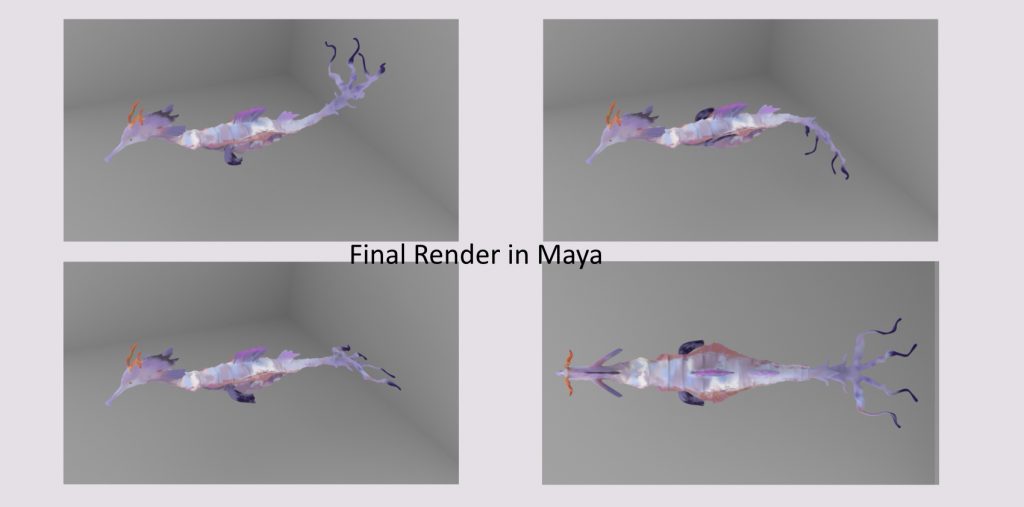
After finishing all the animation, I started rendering the final animation video. In Maya, I set the timeline range from frame 1 to frame 200, which was my complete swimming loop. I opened the render settings, switched to the Arnold renderer, chose JPG as the image format, set the resolution to 1920×1080, and kept the frame rate at 24fps. After setting up the camera angle, I clicked batch render and let Maya output each frame one by one. When the rendering finished, I got 200 JPG images in the output folder, from frame 1 to frame 200. I then imported these images into a video editing tool, and inside that tool I treated the image sequence as continuous frames, assembling them into an animation video at 24fps. The result was a clean animation loop without any music or text added.
Exporting from Maya to Unreal Engine after Animation
After finishing the rigging and animation of the seahorse in Maya, the next step is to bring everything into Unreal Engine. First, I do some cleanup and baking in Maya. I check the joint names and hierarchy, making sure there are no Chinese characters or special symbols – all names should be in English, like root_jnt, tail1_jnt, tail2_jnt, spine1_jnt, neck_jnt, head_jnt. I also hide the controllers or put them in a separate display layer so they are not exported together with the skeleton and mesh.
Before exporting, I need to bake the animation onto the joints. Since the animation was created using IK handles and controllers, UE might not interpret the IK correctly if I export directly. So I select all the joints that need to be exported, then go to the Animation module in Maya and run Bake Simulation. Specifically, I select the root joint, open Edit → Keys → Bake Simulation, set the time range to cover my animated sequence (for example, frame 1 to frame 240), and keep the sample rate at the default (one key per frame). This bakes the motion from the IK controllers into rotation and translation keys directly on the joints. After baking, every frame of the joints has keyframes, and the animation is no longer dependent on the controllers.
Then I export the FBX. I select the root joint together with the mesh (or just select the mesh and joints, letting Maya automatically include the joints), then File → Export Selection. In the FBX export settings, I pay attention to a few things: the FBX file format should be 2020 or later; I turn on the Animation option and confirm the time range and frame rate (usually 24fps or 30fps, matching the Maya project); in Advanced options, I check Skins and Blend Shapes (if any); I enable Smoothing Groups; under Units, I confirm that the scale is in centimetres, matching UE. I also check “Bake Animation” and set “Bake Resample All” to 1 frame to avoid losing animation data. I do not check “Constraints” or “Controllers” – only the skeleton and mesh are exported. After applying the settings, I click Export to get an FBX file.
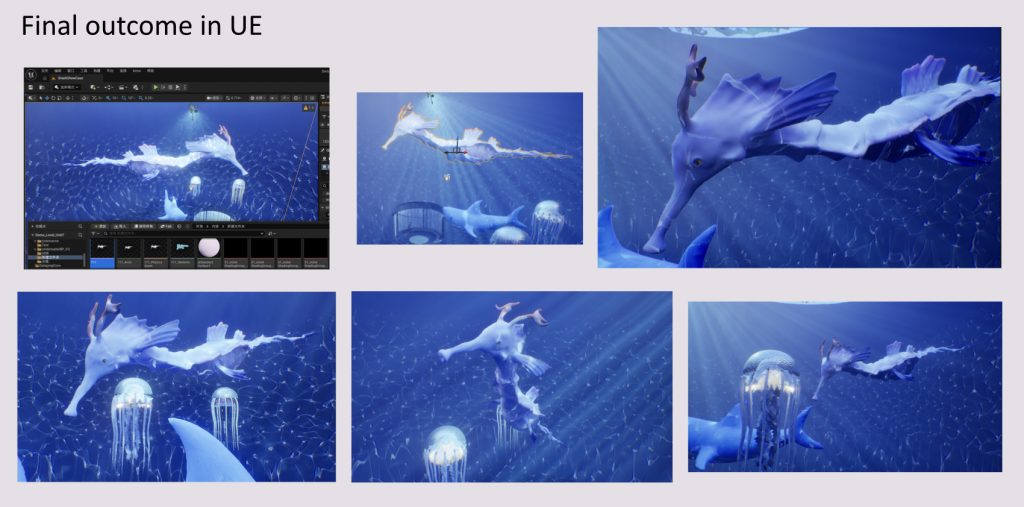
Next, I open Unreal Engine and create a new project or open an existing one. To import the model and skeleton, I drag the FBX file into the Content Browser. In the import window, I confirm that the Mesh type is “Skeletal Mesh” and leave the Skeleton option empty (so UE automatically creates a new skeleton). I also check both “Import Mesh” and “Import Animations”. Since the FBX already contains animation tracks, UE will ask whether to import the animation. I choose to import the animation sequence (or all sequences if there are more). For additional animations, I can export separate FBX files later.
After the import finishes, three main assets appear in the Content Browser: a Skeletal Mesh (the seahorse model), a Skeleton (the joint hierarchy), and one or more Animation Sequences. I double‑click the Skeleton to check that the joint hierarchy and naming are correct. If there are orientation issues (e.g., the joint X axes are not aligned consistently), I can use the Retarget Manager inside the Skeleton asset, but usually no adjustments are needed if the setup was already correct in Maya.
Now I apply the materials. The textures exported from Substance Painter (BaseColor, Metallic, Roughness, Normal, etc.) need to be imported into UE. I drag the textures directly into the Content Browser, then create a corresponding material: right‑click → Material, name it e.g. M_Seahorse. In the material editor, I connect the textures to the appropriate nodes: BaseColor to Base Color, Metallic to Metallic, Roughness to Roughness, Normal to Normal. I can also adjust parameters in a material instance if needed. Then I assign the material to the Skeletal Mesh asset (open the mesh, and in the Materials slots, assign the material).
The animation has already been imported as an Animation Sequence. I can double‑click it to preview. If I need to adjust the animation speed or set it to loop, I can change the Rate Scale and enable Loop Animation in the Details panel of the Sequence asset. To make the seahorse move in the game scene, I need to create an Animation Blueprint. Right‑click → Animation → Animation Blueprint, and select the Skeleton as the target skeleton. In the Animation Blueprint, I set up a State Machine in the Event Graph and place the imported swimming animation into the default state. Then in the Anim Graph, I connect the output pose. Finally, I assign the Animation Blueprint to the seahorse character in the scene – either by creating a blueprint or simply dragging the Skeletal Mesh into the level and setting the Animation Class to the newly created Animation Blueprint in the Details panel.
If I want to control the seahorse’s position and rotation inside UE (for example, making it swim along a spline), I can create an Actor Blueprint, add a Skeletal Mesh component, reference the seahorse’s Skeletal Mesh and Animation Blueprint, and then write some simple blueprint logic to play the animation and handle movement. This completes the entire process from Maya to Unreal Engine – animation baked, exported, imported, and the seahorse character fully set up.
Leave a Reply